iOS bug sends iPhones into endless crash

https://www.youtube.com/watch?v=PmgI0LaFYLA


There’s a bug in Apple’s iOS 8 that allows nearby attackers to send apps—and in some cases the iPhone or iPad they run on—into an endless reboot cycle that temporarily renders the devices useless, according to researchers who demonstrated the attack Tuesday.The exploit uses a standard Wi-Fi network that generates a specially designed secure sockets layer (SSL) certificate to exploit the bug, according to the researchers, who work for Israel-based Skycure. The encrypted communication causes whatever apps happen to be connected to the booby-trapped Wi-Fi network to crash. The vulnerability was introduced in version 8 of the Apple mobile operating system.

Read on, source: iOS bug sends iPhones into endless crash cycle when exposed to rogue Wi-Fi | Ars Technica

Simpana 8.0 and Linux Clients – 19:599

Recent experience with Simpana is that jobs are submitted to for backup yet fail instantly after the job is started with error 19:599. Not much to go by and not much in Google either; nor the forums.

This issue seems to happen after the upgrade of Ubuntu based client to OS and security patches to 14.04.

Re-installing, reboot of the client and connectivity tests (ping, dns resolution, telnet client 8400+8402 to CV, and Media box; then all the way back again) do not resolve the issue.

After enough days of reading longs, the /etc/hosts file was found to be bad in that erroneous entries as such were present:

127.0.1.1 Localhost

One would expect the CV agent to be bound to an IP address, however along the way you will be fooled by the simple fact that the machine is about to answer to pings, had the required ports open, dns also matches its IP address, and firewalls have been disabled for testing purposes, so, from a network point of view; all is well. Change this and you will be in business.

Resolution is as follows:

  • Change the /etc/hosts entry with your favorite txt editor hosts to the actual IP of the client:
    • Original – 127.0.1.1 Localhost
    • New – x.x.x.x fqdn
  • Restart of the Simpana services from terminal using sudo simpana restart 
  • Check that your services are running with sudo simpana list

You will now find out that restarting the job with allow for a successful backup.

Migrate Your WordPress to Turnkey-WordPress

So, today I had decided to try out TurnKey linux to run my wordpress instead of the traditional ubuntu + all the manual components to a simple, out of the box solution that could be run as a virtual machine with a readily prepped linux environment.

Getting the machine going is a breeze, a quick tutorial may be found here:

About 5 minutes – pretty straight forward to setup.

Seeing this blogpost is going to be hindsight for me and informative for you, I would also recommend using VMWare Workstation for the snapshots, I took one once I had a clean VM with all the patches and such.

If you have only been needing a clean install, you can stop reading here but if your are upgrading, the following steps will save you a bit of googling.

First of all you will need to export your original posts which can be found from your tools > export of your original worpress.org site.

Next up, we will assume you have already gotten your site up and running if you followed the guide above because you will need to re-import it into your new site. This you will do after logging into your new wp-admin. Below are a few considerations which should be tackled in the following order:

  1. Login – and create yourself a new user – this user will be used to take ownership of your posts in your NEW blog.
  2. When importing, WP will ask you to download a the WordPress importer; do it!
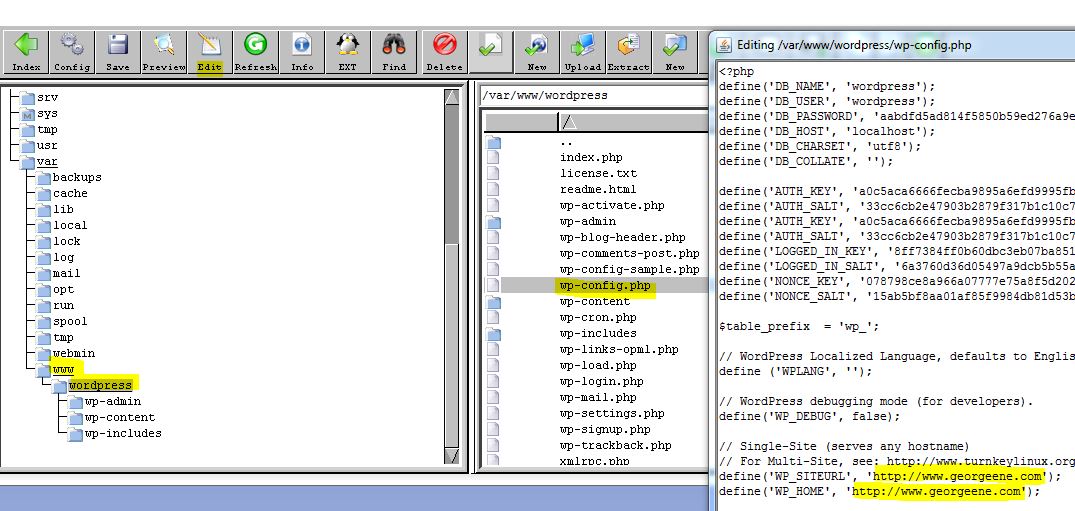
  3. Once imported you will need to alter your wp-config.php, please also note the location and how I modified it.
    Turnkey offers a nice/lazy way of editing your config files. This can be found at https://wp-ip-address:12321 then navigate to your Tools then File manager.
    Modify the following few fields withing the php file. wp-config
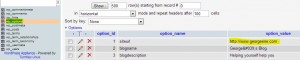
  4. Ok, we are halfway there. Now to change two fields into on your database, logon to your php myadmin using https://wp-ip-address:12321, select your wordpress database from your drag-down box. and open your wp_options table. Here you will need to change two fields; home AND site url to incorporate reflect your new site.
    siteurl
  5. Probably the most important issue I have faced is getting the <a href> of the pictures pointing towards the external facing site and not the internal ip address of the server. to address that, a little hunting around gave me the following SQL query I ran on the website instead of doing it manually.
    You can tun the following update by clicking on SQL on your MyPHP:
    UPDATE wp_posts set post_content=REPLACE(post_content, ‘192.168.2.225/’, ‘www.georgeene.com/’)

And – Voila and welcome to your new wordpress block running on next to no resources and is FAST given the apace + debian back-end.

USB over Ethernet for your VMs

In today’s environments, you will be needing a USB over Ethernet solution in order to get rid of your old dying hardware/workstations/servers in order to move everything to your enterprise level hardware – Enter Jaycar’s USB over Ethernet server.

usb 2 server


Assumptions:

  1. Your connecting OS will be Windows 2008 r2.
  2. Your network segmentation will allow for broadcast traffic to where your USB box is sitting.
  3. You have purchased a YN8406:
    http://jaycar.co.nz/productView.asp?ID=YN8406&keywords=usb+server&form=KEYWORD

Lets begin, you will need to worry about your drivers, and a few modifications to your VM.

Drivers:

First of all you will find the drivers originally bundled with the unit are no good and will not successfully install. Throw them out.

The following drivers have been tested as working in a production environment. These come from Elite Silicon Technology and as you would expect, from China but they work.

Install these and assuming your USB server is plugged into the power and on the same broadcast range the app will be able to find it. On the other hand, if you will need to change its IP address you will be able to do so from the USB server software you have downloaded and installed above. If need be, as best practice I would still recommend connecting it to an isolated network/cross-over to give it your static IP.


OS Modifications/Considerations:

Application – the USB server software runs as on auto start (not a service) and will conflict if multiple users run the app. Too many instances and it will confuse itself and crash. This would be in the scenario that USER1 tells it that is want port 1 and 2 mounted, while user 2 wants port 1, 3 connected.  So here are my workarounds:

First of all, disable the application from starting up from every Tom, Dick and Harry logging onto your server.

Run your msconfig and disable it from there.

Disable it from starting up

Now, create a service account you will be using to start it up with – nothing special, I did not make mine an administrator:

Service Account

You have now stopped the USB server software from crashing and being a general nuisance. Lets setup the task:

ensure it is run under the new account your have created
at startup run this exe.
this is to be run at startup if your computer USB dongles remounting is to survive a reboot.

To sum up:

  • You have installed drivers that work for Windows 2008 r2.
  • You have disabled multiple instances of the software to ensure it does not crash.
  • You have created a service account.
  • You have created a new task to allow it to survive a reboot.

Lastly – and most importantly; RUN THE USB SERVER SOFTWARE AS YOUR SERVICE ACCOUNT – log into your server and it is as the newly created user. The software is pretty dodgy in that you may have different USB dongle mount profiles, do not allow it to to confuse itself. Sadly, given the way the software is written, it will be a “One user, One application” scenario during which you may tell it to auto mount whatever ports you need mounted.

One other aspect this piece of hardware and software answers is that it may be a 1 to many setup (one USB server to many virtual machines).